There are a lot of different reasons that cause people to register on Facebook but the mostly common is the longing for new acquaintances or even the wish to socialize which means to get in touch with current friends or attempts to find them at least in the vast expanses of the net.
The social networking site provides the opportunities to communicate with any people you are interested in but obviously only if they want to be your chat partner. By the way Facebook offers a very useful service called Friends Lists that allows you to organize your numerous contacts and put them in a special helpful order. Facebook users can create their own lists of friends dividing the existing one into several groups, for example.
Don’t forget that people added to your Facebook Friend lists may be able to share your personal data. That is why you are kindly requested firstly to check if the new person is a trustworthy one and only then allow him/her to get access to certain personal info.
1) First of all log in to the social networking site and send the requests to all of your friends who already have accounts as your friends.
2) Secondly, find the link labeled as “Friends” and placed in the top menu bar. You will be redirected to the page that shows the recent updates of your Facebook friends.
3) After pressing “All Friends” button on the left side of the menu you’ll find yourself in the section that will prompt you to “Make a New List”. If you click this button you will be asked for a name of your new Friends List. Usually the names reflect the type of connection with the people, e.g. School, Work, Relatives etc. Don’t forget to push the button “Enter” after this.
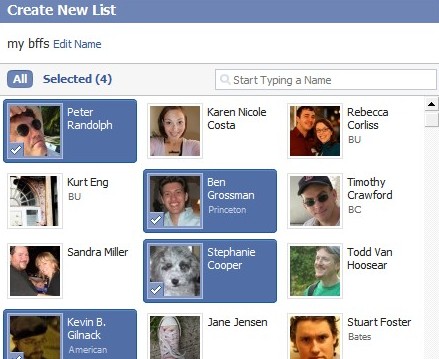
4) Thereafter you have to write usernames of the people you want to add to the new Friends List. You are provided with the opportunity to add your friends in two ways: either by separate selecting of their names from the whole list of your added friends or by using “select multiple friends” option in order to see and add all your friends into this list. Having chosen the latter option you will see pictures of your friends under the list. If you intend to add them to your list, just click on their profile pictures.
5) Finally press button “Save List” that is placed at the bottom of the screen. I need hardly say that you should check the list before clicking the just mentioned button.

